A Midsummer’s Daydream

If you could dream up the perfect perennial what would be on your wish list?

How about big beautiful blooms? Check.

Long blooming? Check.

Enormous selection of bloom colours, bloom-times, sizes etc.? Yes indeed.

Easy care? Definitely.

Tidy growth habit? For sure.

Handsome foliage? Yes please!

Anything else? Let’s see……..how about sweet but subtle fragrance? Yes definitely!

If only we could conjure up such a plant…..but alas it’s only a dream. Well maybe not; that dream plant sounds decidedly like Hemerocallis, the daylily – in fact this perennial has oft been called the ‘perfect perennial’. Hard to believe then, that there are those who claim not to like daylilies, scornfully referring to them as ‘ditch lilies’. Ouch, what a derisive term for such a beautiful, useful, reliable perennial!  As a designer, in a difficult climate, I can’t imagine the midsummer border without them. Some are even fragrant.  And they have few enemies, except for maybe hail but don’t get me started on that (I have yet to fully assess the damage from Sunday night’s storm). Granted, the daylily dissenters are likely referring to the tawny daylily, Hemerocallis fulva, that ubiquitous orange thing found in many a tired garden – but even it has its place.

Daylilies Reader Rock Garden resize

Hemerocallis fulva – that old garden variety daylily – can make a stunning statement when used effectively. Left: tawny daylilies line the sidewalk leading to Reader Rock Garden. Photo: Pat Gaviller. Right: beautifully paired with blue Delphinium. Photo: Sue Gaviller

This summer has been exceptional for Hemerocallis, at least in my own garden, which is home to numerous spectacular cultivars – every single plant is loaded with blooms.  But let’s revisit our wish list and see whether this ‘perfect perennial’ meets all of our expectations.

Big Beautiful Blooms

Generally speaking, daylilies are a large-flowered perennial – even the smaller cultivars have relatively big blooms compared to other perennials. Because the blooms are large, and profuse, the colour impact is significant, especially the brighter-hued selections. So don’t go wild with too many different colours blooming at once.

Strutter's Ball Daylily 2 resize

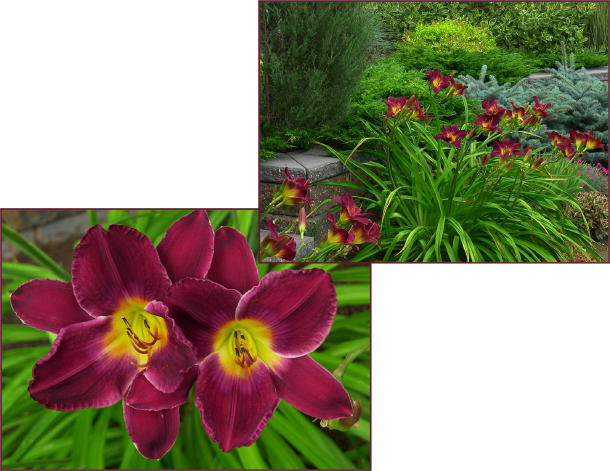
Hemerocallis ‘Strutter’s Ball’ is a big beefy daylily and can hold its own even when surrounded by mostly woody plant material. The velvety magenta flowers are huge and very showy.
Photos: Sue Gaviller

Hemerocallis ‘Purple Bicolour’ – a rather simplistic name for a stunningly unique cultivar. The soft rose-pink petals and sepals, and the wine-purple eye zone, merit a more exciting moniker. How about ‘Wine and Roses’ – a much more fitting name don’t you think? Photos: Sue Gaviller

Long Blooming

While each individual flower opens for only a day, there are so many buds on each branched scape that a single plant can bloom for weeks. And since there are early, mid-season, and late bloomers, daylily season is pretty much all summer long. As well, there are an increasing number of reblooming varieties that can rebloom several times throughout the summer.

‘Stella d’Oro’ was the first ever reblooming daylily cultivar. Her reliable bloom habit and dwarf form have made her a favourite of both gardeners and landscape professionals. Photo: Pat Gaviller.

Another reblooming cultivar, ‘Little Grapette’ is a dwarf selection. Though the blooms are smaller, they are profuse and richly coloured, so provide significant colour impact. Photo: Sue Gaviller

Enormous selection

Daylilies were once dismissed as pedestrian plants unsuitable for the sophisticated garden, but early in the last century they made a come-back with the introduction of new colours. This daylily renaissance marked the beginning of a new era in Hemerocallis hybridization, with cultivars now numbering in the tens of thousands – over 60,000 registered cultivars now exist! Breeding programs have produced a mind-boggling variety of colours – reds, oranges, yellows, golds, pinks, peaches, dark wines and purple-reds, near-whites and bicolours. Some have ruffled edges, some are fragrant, some dwarf and some huge. Early bloomers, mid-season bloomers, late bloomers and rebloomers……well you get the picture.

Much of the breeding has concentrated on producing new tetraploids – this refers to the number of chromosomes; 44 for a tetraploid, 33 for a triploid and 22 for a diploid. Those extra chromosomes result in stouter scapes and sturdier petals and sepals – thick and almost rubbery compared to the papery thin petals and sepals of non-tetraploids.

Chicago Antique Tapestry resize

Hemerocallis ‘Chicago Antique Tapestry’ – a rare find, this tetraploid is a really classy cultivar. Huge, ruffled and mildly fragrant blooms – a real stunner. Photo: Sue Gaviller

Another tetraploid, Hemerocallis ‘Starling’ is a regal addition to the midsummer border, pairing well with the above mentioned ‘Chicago Antique Tapestry’. Photo: Sue Gaviller

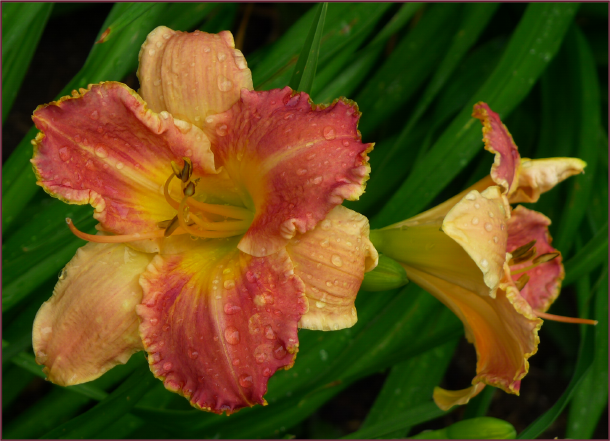
Hemerocallis ‘Kitten’s Paw’ is bright peachy pink – a lovely tetraploid with characteristic sturdy scapes and firm petals. Photo: Cathy Gaviller

Ruffled, spicy orange Hemerocallis ‘Hot Embers’ – another stand-out tetraploid. Photo: Pat Gaviller

Easy Care

Daylilies aren’t fussy plants – they’ll be happy just about any place you put them. From zone 1 to zone 11, in sun or light shade, moist or dry, clay or sand, they will perform. They are sufficiently drought tolerant to be a staple in our semi-arid climate, but they will appreciate a little extra water when in heavy bloom.  Deadheading every day will keep the plants looking fresh – luckily this is an easy task as the spent blooms snap off easily. I can deadhead all of my 20+ plants in a matter of minutes. Hemerocallis is for the most part pest and disease free and requires dividing only occasionally. I’d call that pretty easy care.

Tidy Growth Habit

I’ve never owned a daylily that required staking or tying of any kind. Even the very tall cultivars like ‘Tetrina’s Daughter’ or ‘Autumn Minaret’ stand up nicely on stiff stems, despite being bloom laden.

Handsome Foliage

Hemerocallis has wide strap-shaped leaves that arch gracefully, so the plant has design value even when not in bloom. They are ideal for underplanting trees or focal points, edging around planting beds, massing, and filling in difficult areas.

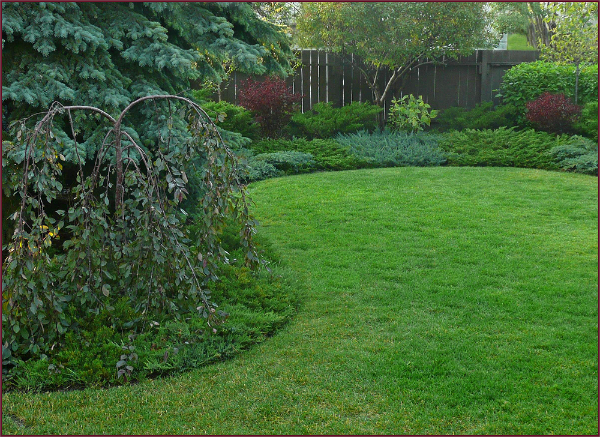
Grassy daylily foliage makes a nice underplanting, lending visual support to the bird bath. Photo: Sue Gaviller

A swath of dwarf reblooming Hemerocallis ‘Stella d’Oro’ is an effective way to plant a difficult space like this long narrow bed. When not blooming the arching daylily foliage still provides a simple elegant line. Photo: Pat Gaviller.

Sweet Subtle Fragrance

Many daylilies have a very pretty scent – some more so than others. It’s not overpowering, but if you’re standing or sitting nearby you’ll get a light bouquet on the nose.

Hemerocallis ‘Mary Reed’ is a dwarf cultivar with pretty mauve-pink blooms and a delicate scent. Photo: Sue Gaviller

Hemerocallis ‘Ivory Edges’ is by far the most fragrant daylily in my garden – strikingly beautiful as well. Photo: Sue Gaviller

When I awoke yesterday morning I peeked out the window to survey the devastation wrought by the previous night’s hail storm. Miraculously, what first caught my eye was cheerful daylily blooms – they seemed to be wishing me a beautiful day. How apt, since the word Hemerocallis comes from the Greek words hemera, meaning ‘day’ and kalos, meaning ‘beautiful’. May your day be beautiful – Hemerocallis!

Thanks for visiting – y’all come back now.
Sue
 
© Sue Gaviller and Not Another Gardening Blog 2012. Unauthorized use and/or duplication of this material without express and written permission from this blog’s author and/or owner is strictly prohibited. Excerpts and links may be used, provided that full and clear credit is given to Sue Gaviller and Not Another Gardening Blog with appropriate and specific direction to the original content.


Yikes! Yellow Spots on my Lawn!

Well not yellow I guess – more like dead brown (is that a colour?) Those of you with dogs know of what I speak – we eloquently refer to these as ‘pee spots’. Since we garden in a dry climate in heavy clay soil, most of us have accepted that a lawn of putting greens quality is unrealistic, but the unsightly patches of dead lawn can undermine the beauty of an entire yard. So what can we do?

The Design Solution

Designing an area for Fido to ‘go’, whether a dog run, or a small space with a pea gravel surface (pardon the pun), may help keep the offending substance off your lawn. This space should be situated where it can be screened from view by either a fence or plantings. And for the sake of the neighbours make sure it is screened from their view too – and please clean up solid waste regularly (daily is best).

The amount of space you allot for lawn in your design can impact both the degree of urine burn as well as how you manage it. For example, having a large lawn space can potentially lessen the severity of damage because it is less concentrated in one spot. However, you will then have brown spots spread over a large area, thus the visual effect will be fairly broad. A small lawn area on the other hand, will sustain more concentrated damage but a smaller area of your design will be visually affected.

This circular lawn space is small and well delineated so resodding monthly is relatively easy.
Photo credit: Prairie Outpost Design

As well, a small lawn area lends itself easily to reseeding or resodding – a colleague of mine with a very large dog has a small circular lawn space which she resods once a month, when her lawn is more brown than green. Because the sod never puts down very deep roots it’s easy for her to roll up when it’s time to resod. In addition her lawn is bordered on one side by a low wall and the rest by an edging of pavers, so there’s no guess-work as to where the design lines are. She tells me it was designed this way purposefully – a small and well delineated lawn that’s easily replaceable so, in her words, “the whole yard doesn’t always look like sh**!”

The Horticultural Solution

Dog urine kills lawn because it is rich in urea, a nitrogenous waste product of protein metabolism. The effect is therefore akin to pouring full strength or insufficiently diluted fertilizer on your lawn, causing nitrogen burn. This is why there is a dead spot encircled with lush green – at the edges the urine is more dilute so the lawn responds as it would to properly mixed fertilizer.

If Fido does happen to relieve himself on your lawn you can prevent the ensuing dead patch by simply watering it down, thus diluting the nitrogen. You don’t have to water your whole lawn, just take note of where doggie pee’d and dump a watering can full of water on the area within 24 hours. Of course the bigger the dog the larger it’s liquid waste capacity. This will in part determine how much water you’ll need to effectively mitigate the damage, as will the overall water content of the soil at the time – you’ll notice that during rainy periods the incidence of ‘pee spots’ is somewhat reduced.

The Culprit – hard to believe this sweet brown beauty is responsible for so much damage to my back lawn.
Photo: Pat Gaviller

Since we can’t always be on guard to witness all dog spots in the making, we will invariably still find ourselves gazing upon dead patches on our lawns. There are a number of remedies for this:

  • Zeolites – have the ability to absorb nitrogen, hence can bind the excess. This can work preventatively as well.
  • Sugar – sugar is a source of carbon for denitrifying bacteria in the soil, hence sprinkling a bit on the dead spot may aid these bacteria in removing the excess nitrogen.

Depending on the type of grass and the severity of the damage the above two suggestions may be enough for the grass to rejuvenate or fill in fairly quickly. Otherwise you can do one of the following:

  • Reseed the area – I mix loam and grass seed 2 to 1 and apply the mixture to each spot. Seed germinates within 7 to 10 days. I repeat this process whenever there are a number of spots.
  • Resod – this doesn’t have to be the wholesale resodding I mentioned earlier in the post. Just cut out the dead patches and replace with a piece of sod cut in the same shape.

A mixture of grass seed and loam is applied to dead patches, gently tamped, and watered daily – seed should germinate within 2 weeks. Photo: Pat Gaviller

2 weeks later – grass seed has germinated and is filling in nicely.

The Other Solution

In addition to the above-mentioned preventative and remedial actions, Fido himself can be part of the solution. This of course requires an expert’s take, in a field other than my own. Enter Pat Gaviller, veterinarian and self-proclaimed ‘dog advocate’. Please read on for more ideas on facilitating a peaceful coexistence between our lawns and our four-legged friends.

Yours,
Sue
 

GOOD BOY FIDO

by Pat Gaviller

How does Fido become part of the solution? With your help of course – for Fido to be a good boy (or Fifi to be a good girl), you have to step up and do some training. Luckily this is quite easy, especially if you start young. However even an old dog can learn new tricks.

The Training Solution

First it helps to know that puppies develop substrate preference – the surface on which they prefer to pee – at the age of 8 ½ weeks. So, think ahead and right from the start have your puppy peeing on the same surface you’ll want him (or her) peeing on in the long run – it will make training easier. It can be a bit of a challenge if during this narrow time window the ground is covered with snow (there’s not much snow around in the middle of July). But necessity trumps preference, and dogs can be retrained – have you ever seen a dog frantically looking for that last patch of melting snow to pee on? Now you know why!

Step 1: you’ve chosen what you want your dog to pee on. Step 2: decide where – dogs also become habituated to a general bathroom location. Step 3: take your puppy to the chosen bathroom area – frequently – practice makes perfect. To quote Jean Donaldson from the book The Culture Clash, (a highly recommended read for anyone wanting a well-trained, well-socialized dog): one requires a “solid history of rewarded trials in the desired location, the yard”, or the run, or wherever you’ve sited his bathroom. This brings us to Step 4 – the reward. Of course for reward one can use the obvious – food; but don’t forget that simply relieving the full bladder is also a reward in itself, and going for a walk afterwards is yet another. Vary your rewards for the best chance of success. For those who are highly motivated you can now move to step 5 – elimination on command. Although for perfect execution the command should be given the moment before the dog starts to pee, for most of us this is can be a somewhat daunting challenge with a new puppy. Not to worry – from personal experience it works pretty well if you just say the command the moment you notice your puppy (or grown dog for that matter) start to pee, i.e. “Go Pee”; wait til he/she’s done; “Good Dog”. Repeat every time puppy pees – of course preferably in the desired location…. This is classical conditioning. After a couple of weeks of saying “Go Pee” when puppy is peeing, you can try saying it before puppy pees, but when you know he/she has a full bladder. Voila – puppy will likely perform. This comes in quite handy in a variety of other situations too – and you’ll be sure to impress your friends!

A word of caution here: once Fido & Fifi are dutifully eliminating on command, do be careful on how you phrase a question to them. In other words, if the command is “Go Pee” and you ask them “Do you have to Go Pee?” they will only understand the words they know. And they may simply ‘Go Pee’ instead of waiting ‘til they get to the chosen bathroom area. To avoid confusion use phrases like “Do you need to go outside?”, or don’t ask, just take them. Truth be told we natter away at our pets far too much as it is and like our kids, they learn to tune us out after awhile.

And I feel compelled to add a few comments on dog run etiquette for those who choose to use this option.

  • Please don’t abandon Fido & Fifi in the run for long periods of time while the rest of the family enjoys the comforts of the house. They need and want your companionship.
  • Don’t leave Fido & Fifi out in the run all day while you’re at work – this is asking for trouble with barking problems. Respect your neighbours and avoid noise-bylaw fines.
  • Clean up after your pet daily. Feces left in the run create more than just odour issues for you & your neighbours. As the feces dry up, small bits of fecal material and the bacteria & parasites they may contain, can blow around in the wind resulting in health hazards for both humans and dog. Gives a new perspective on ‘dust devils’ now doesn’t it?

Mars vs. Venus

It’s time to put to rest once and for all the myth that female dog urine burns the grass and male dog urine doesn’t. The only difference between male and female dog urine is the presence of a few hormones and pheromones, which have absolutely no effect on our grass. Fido & Fifi are very interested in these minute differences because they can smell them. And I’m sure they can also figure out what each other had for dinner via the same method…..but I digress. The reason Fifi’s urine is typically more damaging to our lawns is purely a volume and directional issue. Fifi usually goes all in one spot, directly on the ground. Meanwhile, Fido is on a mission marking his territory. He’s lifting one hind leg & spraying his urine, a little here, a little there – some of it hitting the ground, but much of it on more vertical surfaces like trees, shrubs, gates, fences, or the proverbial fire hydrant. This makes it easy for any other dog passing by to catch a whiff close to nose height. And Fido only does a little in each spot to make sure he has enough to go around. It’s Fido’s behaviour that spares your lawn, (and kills your junipers…) not some magical difference in his urine.

Given that Venus is at various times either the morning star or the evening star, I might as well also address here the ‘difference’ between morning and night urine. Yes, there can be a difference, though it will vary from dog to dog depending on diet, time of feeding, and kidney function. Typically the first urination of the morning has the potential to be more damaging for 2 reasons: 1) It’s usually a large volume – the dog hasn’t been out all night and hence has a full bladder; and 2) most dogs sleep through the night, without drinking any water and therefore the kidneys concentrate the urine to prevent dehydration. A high volume of concentrated urine is a recipe for lawn damage. When Fido & Fifi eat, they also drink more. And if they’re lucky the day’s activities have also allowed both an increased water intake plus more access to outdoor elimination areas. Increased water intake lowers urine concentration, and increased frequency of elimination may lower urine volumes, both of which give our lawns a bit of a break.

There’s an App for That

Yes, for those with neither the time nor the inclination to deal with this issue in any of the aforementioned ways, or even as an adjunct to the above methods – there’s always Greenum. Greenum is a commercially available, natural supplement available at your local vet clinic as well as many pet stores. Made by “Mark & Chappell” the tablets contain Brewers Yeast, Flaxseed Oil, DL-Methionine (an amino acid), and Yucca schidigera extract. It is the last 2 ingredients that help reduce the ‘lawn-burn’ effect of dog urine. DL Methionine acidifies the urine (don’t think vinegar, just less alkalinity), and the Yucca extract binds the ammonia in the urine. Less alkalinity + less ammonia (less nitrogen source) = less lawn burn.

Greenum is available in a beef-flavoured tablet form as well as tasty treats. There is a spray too – but the spray is applied to the lawn, whereas the tablets and treats are given to Fido & Fifi. Greenum is safe for pets and the environment. In fact if you overdose by 2x you simply nullify the effect. The tablets are available in different sizes for different size dogs; treats come in 1 size only. As with any supplement – natural or otherwise – you should still consult your vet before starting your pet on Greenum, especially if the pet is already on other medication.

So there you go – greener lawns and a peaceful coexistence with Fido & Fifi.

Have fun,
Pat
 
© Sue Gaviller and Not Another Gardening Blog 2012. Unauthorized use and/or duplication of this material without express and written permission from this blog’s author and/or owner is strictly prohibited. Excerpts and links may be used, provided that full and clear credit is given to Sue Gaviller and Not Another Gardening Blog with appropriate and specific direction to the original content.

Curtain Call – Farewell to Sweet Syringa

So y’all know how much I love lilacs. Well I’m sad to say they are nearing the end of their bloom period, so I wanted to give you a look at the closing act before the curtain is drawn on another season.  I know, enough with the lilacs already – I assure you though, today will be my last post on this loveliest of blossoms (at least for this year) and I promise to keep it short.

Syringa reticulata – Japanese Tree Lilac

These gorgeous, very late bloomers have been flowering for a week or so in our part of the world. They weren’t in bloom for my June lilac post but they are so utterly stunning this year, that I had to bring them to your attention. The Japanese tree lilac is the last of the lilacs to bloom and has some unique characteristics not shared by others in the genus:

  • They are a true tree, as opposed to a large shrub that gardeners prune into a tree ‘shape’ and labour to maintain.
  • The bark is a dark chocolate-brown with very noticeable lenticels.
  • The flowers are borne in panicles like all other Syringa species but have much finer texture, their feathery appearance in striking contrast to the large shiny leaves.
  • The scent isn’t recognizably lilac; it’s hard to describe, but if you get a whiff of something sweet and a bit spicy, like vanilla with a hint of anise, look around – there’s likely a tree lilac in the vicinity. Their bright white blooms make them easy to spot.
  • There is even a variegated cultivar which blooms later still (mine is just coming into bloom now) – ‘Golden Eclipse’ has large green and gold leaves.

Intense white blooms cover this compact tree. Photo: Pat Gaviller

Soft fluffy blooms, dark green foliage and richly textured, chocolate-coloured bark make the Japanese tree lilac a must-have in the urban landscape. Photo: Pat Gaviller

Full feathery plumes light up a sapphire sky. Photo: Sue Gaviller

Syringa reticulata, with its honey-sweet scent is a favourite of bees and butterflies. Photo: Cathy Gaviller

Syringa reticulata 'Golden Eclipse' is a very hardy variegated cultivar - leaves on new growth emerge dark green splashed with lime and older growth has bright green and gold variegation. Photo: Sue Gaviller

Syringa reticulata ‘Golden Eclipse’ is a very hardy variegated cultivar – leaves on new growth emerge dark green splashed with lime and older growth has bright green and gold variegation. Photo: Sue Gaviller

Sum it all up and you have a great specimen tree – a tree with four season interest. The Japanese tree lilac has real design value and in my opinion is greatly underutilized in the landscape. It’s perfect for use as a dominant feature – for its elegant form (particularly if multistem), its colour (especially Golden Eclipse) and its coarse texture.

Syringa reticulata is a worthy closing act to a truly fine show that began 6 weeks ago – the lilac show.

So say goodbye to sweet Syringa – may their scent be with you.

Sue
© Sue Gaviller and Not Another Gardening Blog 2012.
Unauthorized use and/or duplication of this material without express and written permission from this blog’s author and/or owner is strictly prohibited. Excerpts and links may be used, provided that full and clear credit is given to Sue Gaviller and Not Another Gardening Blog with appropriate and specific direction to the original content.

The Principled Gardener

No, I don’t mean the gardener who has principles (though I’m sure you do); I’m referring to the gardener who uses principles – design principles that is. Last month (Good Lines Mean Good Designs Part 1 and Part 2) I discussed the first two stages of the design process – functional drawings and concept drawings. The final stage is a Planting Plan, but before we can complete this design process, a look at the principles that guide it is in order.

So what are design principles anyways?

Design principles are guidelines that help create pleasing relationships between the various elements of a composition. If you’ve ever picked up a garden design magazine or attended a garden design lecture, you will no doubt have been introduced to the concepts – they may not always be presented in exactly the same framework or use exactly the same terminology, but the constructs are nevertheless the same. I like to think of Design Principles not so much as rules that must be followed, but rather as a way of understanding how the human eye perceives its surroundings and using that to its best advantage.

Gardeners don’t always recognize when they’ve utilized a design principle. Though it may happen by accident, a well designed garden will most certainly have some or all of these principles incorporated in it. It would be so much easier though, if we knew what they were and how to use them, instead of the trial and error approach that most of us employ.

So let’s get started. As I mentioned, Design principles can be organized or categorized in numerous ways, but for the sake of simplicity I’m going to call these principles Unity, Balance, Movement, Scale and Proportion.

UNITY

According to the Canadian Oxford Dictionary, Unity is defined as:  Oneness, being one, interconnection of parts, coherence of parts. So how do we bring that ‘oneness’, that ‘coherence of parts’ into our gardens? There are several ways we can achieve this – repetition, dominance, unity of three and interconnection. Unity then, is an umbrella principle for all of these concepts. Today I look at Repetition.

UNITY by REPETITION

Repetition refers to the repeated use of the same or similar elements throughout a composition.

Plant Material

One of the easiest things to repeat in your landscape is plant material – gardeners often do this unknowingly in their early gardening years, and then abandon it. For many of us our first gardening ventures are somewhat tentative and often constrained by budget limitations. We gladly accept our next door neighbour’s offer of perennials that she’s dividing or discarding. We take a few clumps of each, and spread them around the garden; hence many plants are repeated several times. As we get more adventuresome, we want to try all manner of new things and before we know it we’ve arrived at the ‘one of this and one of that’ scenario, which is anything but coherent.  It’s an expensive mistake and wasteful at that – in order to repeat you now have to reduce. Restraint people, restraint – you don’t need one of every plant in order to attain beauty and diversity in your garden. So, the next time you have some perennials that need dividing, don’t discard the extras, or give them away –  repeat them!

Photo: Sue Gaviller

Numerous plants, including creeping thyme, Goldmound spirea, blue oat grass and bugleweed, are repeated throughout my front garden beds. Photo: Sue Gaviller

Photo: Marg Gaviller

Hosta and red Astilbe are the recurring plant theme in this mature garden.
Photo: Marg Gaviller

Building Material

The repeated element can also be a building or hardscape material, for example; brick, wood or stone. Repeating this in the landscape allows house and landscape to appear as one entity. Conversely, using a material in the landscape that doesn’t also occur on the house, can result in a visual disconnect between house and landscape.

Incorporating a building material from the house, into the surrounding landscape, unites house and landscape. Photo: Sue Gaviller

Incorporating a building material from the house, into the surrounding landscape, unites house and landscape. Photo: Sue Gaviller

Stone pillars echo the stone facing on the house. Photo: Sue Gaviller

Architectural Features

You can also repeat an architectural line or feature. For example, the shape of an arched window could be repeated in the shape of a garden bed or in the arching branches of a weeping tree. A unique detail on the house could be the inspiration for a fence or arbour design.

repetition - line

The arches on the house are repeated in the arching form of this Caragana arborescens ‘Walker’s Weeping’. Photo: Sue Gaviller

The diamond shape detail on the windows was the inspiration for the fence I designed for a client’s home. The fence is being installed as I write this, hence the computer generated image.

Colour

A colour can be repeated as well – bringing a colour from the house into the landscape or using a recurring colour within a garden composition, can unify your whole outdoor space. A purposeful colour scheme will allow you to do this with some real finesse (more on colour schemes in another post). Keep in mind that choosing a plant for its flower colour will provide colour repetition, but only when it’s in bloom – to achieve this throughout the season, choose plants with colourful foliage too.

The colour of the front door is seen again in the Chrysanthemums. Black is also repeated, as is the architectural detail of the columns, which is repeated in the planter pedestal. Photo: Pat Gaviller

Repeating a colour within a planting composition is very unifying – here the dark wine colour of emerging Acer palmatum leaves picks up on the same hue in the tulips.
Photo: Jane Reksten

By repeating elements that are the same, or have similar characteristics, the eye posits each recurrence into visual memory and ties them all together in one coherent theme – voila Unity!

Yours,
Sue

© Sue Gaviller and Not Another Gardening Blog 2012.

Unauthorized use and/or duplication of this material without express and written permission from this blog’s author and/or owner is strictly prohibited. Excerpts and links may be used, provided that full and clear credit is given to Sue Gaviller and Not Another Gardening Blog with appropriate and specific direction to the original content.

All Creatures Great and Small

All things bright and beautiful,
All creatures great and small,
All things wise and wonderful:
The Lord God made them all.

I doubt that when Cecil Francis Alexander penned the chorus to this popular children’s hymn, she was staring down at a rabbit-chewed stump that was once a rose – or a tree trunk stripped almost bare of bark, or ornamental grasses mown down in the first flush of spring growth.

It can be immensely disappointing when our favourite trees, shrubs and perennials are razed by the likes of Peter Rabbit and Squirrel Nutkin. Unfortunately, solutions to this nuisance are less than perfect but there are a few.

The Design Solution

Designing a garden that is rabbit resistant entails housing vulnerable selections i.e. ‘rabbit candy’, in raised beds, containers or enclosures of some kind. Obviously rabbits do jump, but a 2 foot raised bed can act as a deterrent, and while a rabbit can squeeze through small openings, a fenced yard or courtyard does offer some protection.  In my own experience, my front yard is fair game for the rabbits but I’ve never seen them, or any evidence of their presence in my fenced back yard.

Unfortunately I can’t say the same for the squirrels – they are ubiquitous.

The smooth shiny bark of Caragana arborescens ‘Walker’s Weeping’ is a rabbit favourite. In this client’s raised planter it is somewhat protected. The underplanting of Berberis thunbergii ‘Cherry Bomb’ offers further protection since its thorny branches serve as a barrier. Photo: Sue Gaviller

And what about deer? Fences and raised beds aren’t going to keep Bambi out – unless they are 8 feet tall. A Shishi-odoshi (Japanese Deer Scarer) is one design solution that comes to mind. This can work for most nuisance wildlife but there are a couple of drawbacks. For one, the aesthetic is expressly Japanese so may not work thematically with all gardens. Second, it may discourage desirable wildlife from visiting. And third, the more brazen intruders like squirrels, could soon habituate to the sound.

Shishi odoshi 日本語: ししおどし

Shishi odoshi 日本語: ししおどし (Photo credit: Wikipedia)

For those living in the country, deer present a much bigger problem, due largely to habitat proximity – this may require a design approach calledDeeroscaping(awesome resource when deer pressure is extreme).

Underplanting susceptible trees with Lavandula or other aromatic, as I have with this client’s top-graft Syringa meyeri, may help deter pests. Photo: Pat Gaviller

Including some aromatic plants in your planting design can also be helpful. Salvia, Lavandula and Nepeta are all objectionable to deer and rabbits – they don’t like the smell. Happily these are pleasant smelling to us and very attractive additions to a garden. Keep in mind though that Nepeta will attract cats – in my neighbourhood we already have a cat problem (a topic for another post), so no Nepeta for me.


Salvia nemerosa ‘Maynight’ is a strongly aromatic ornamental sage which may discourage rabbits and deer. Photo: Sue Gaviller

Some gardeners will use wire baskets or chicken wire contraptions to cover anything that’s showing signs of pest activity. From a design perspective this is a poor solution – while it may indeed protect your plants, it is unsightly. I don’t think sacrificing the beauty of a garden for 6 months of the year is an acceptable price to pay, so unless these devices can be obscured from view, I personally don’t use them. The exception would be trees. Rabbits and deer love to nibble on the bark of certain trees; Malus, Populus, Salix and other trees with thin bark (also young trees). If the bark is damaged more than halfway around the trunk, the tree may not survive. Therefore I do recommend protecting trunks of susceptible trees, particularly in the winter – if you can do so inconspicuously, all the better. The trunk of my Malus ‘Pink Spires’ sustained extensive rabbit damage this past winter, until we wrapped it (loosely)with chicken wire. Because the tree is fronted by a bird bath and obscured from other vantage points by shrubbery, the chicken wire isn’t visible.

Most shrubs and perennials that have been chewed by rabbits will recover. Trees on the other hand may not – if more than half of the trunk circumference is damaged, the tree’s chances of survival are slim. The trunk of this Malus ‘Pink Spires’ is almost completely girdled in one spot, so it may well succumb to its injuries within the next year. I am keeping my fingers crossed though.

The Horticultural Solution

For most of us, by the time we discover we have a ‘critter’ problem, design solutions like raised beds or courtyards are no longer options, at least not without a costly and/or time-consuming redesign. So what can we do? Well we could remove altogether, anything that’s being eaten. However, what a particular animal finds tasty may not be consistent – in my own garden, the squirrels consistently bite the flower buds off one of my Scabiosa caucasica ‘Ultra Violet’, but leave the other two alone. Festuca glauca ‘Elijah Blue’ was sheared to the ground by rabbits every spring (and again as soon as it recovered from the first assault), until I moved it to the back yard. Spiraea bumalda ‘Goldmound’ is also ‘pruned’ to the ground every winter. It grows back though and stays quite compact thanks to the rabbits, so it’s not a problem. For many years these were the only plants bothered by nuisance wildlife.

Then last year I noticed elevated rabbit activity; all of my Heucheras were bitten off (silly rabbit didn’t eat the foliage, he just ate the tender juicy stems and left the beautifully coloured leaves scattered on the ground). Helictotrichon sempervirens – big bites out of it (weird because it has a very unpleasant tactile surface). Roses – gnawed to the ground (ouch, don’t they know roses have thorns). It seems a bunny is living somewhere very near my garden, though I’m not sure exactly where. I see him basking in the sun on my lawn or my neighbour’s lawn. And I do mean basking– splayed right out as if he was dead. And brash he is too. When I shoo him away he moves off slowly and nonchalantly – if he could speak I’m sure he’d be saying, ‘Yo, lady. What’s your problem?’

But I digress.

There are commercial rabbit, deer and squirrel repellents on the market, some of which are safe and environmentally friendly, others not. In addition, there are home remedies you can try – some target a specific pest, but since all are herbivores with similar fear responses, what works on one will often work on all.

  • In a comic strip a few years ago, one of the characters placed dog hair around plants to deter rabbits and squirrels. I tried this and it was actually working until the birds discovered the dog hair and decided it was excellent nesting material. My dog couldn’t shed fast enough to keep up with the demand for her hair so I gave up.
  • Blood meal is a strong disincentive for deer, rabbits and squirrels. A teaspoon or so sprinkled around the plant works very well, but it needs reapplication after it rains. Unfortunately blood meal can attract cats, though in my experience it doesn’t seem to draw them with any more frequency than usual. If you live in an area where bears and/or cougars are common, blood meal is not recommended as it may attract them. As well, because blood meal is a source of nitrogen, if frequent reapplication is required you run the risk of encouraging too much leafy growth. This can then create other issues; slugs and aphids to name a couple.
  • Crushed garlic in some water, steeped for a few days, then strained and sprayed on plants can be an effective repellent.
  • The presence of human urine, particularly male urine, is also purported to deter nuisance wildlife. Several years ago I advised an acreage client to, ahem, ‘mark his territory’, which he did and I believe it in fact reduced pest activity. Hard to say how it would have worked in the long-term though as I don’t think he was willing to continue this practice indefinitely. For city dwellers, you’ll have to be a little more creative in the method you ‘apply’ this if you don’t want to be noticed. And be sure to drink lots of water.
  • Other homemade concoctions may be also effective, but I urge you not to use any that have cayenne or Tabasco sauce as ingredients – I don’t think our aim should be to cause pain.

The Culprit – this fluffy fella camped out in my front yard all winter. I suspect it is the same rabbit who made my garden his favourite lunch spot last summer, as he has the same brazen attitude.
Photo: Pat Gaviller

So now that you have a few weapons in your arsenal let me offer…

Another Perspective

When we first embark on the journey that is gardening, it’s very much about ourselves – what we like, what we want. It’s not intentionally selfish, but we’re a bit like the youngster who is determined to ‘do it by myself ’. We’re content to putter and play in the dirt and we’re not much interested in what the experts, or the neighbors, have to say.

Once we’ve gardened for a few years, and after countless mistakes (sometimes expensive ones) we recognize that some advice from a garden designer or coach might be helpful. And we become all too interested in what the neighbors and passers-by have to say.

Eventually enlightenment comes, with the realization that our gardens are much more than just playgrounds for our green thumbs, or a source of affirmation for our needy egos. Our gardens are enormous ecosystems, home to millions of life forms, some we can’t see, some we can’t pronounce and some we’ve never even heard of. While not all of them can be deemed ‘beneficial’, they all have a role to play. Aphids for example are pests to be sure, but they are also a food source for an army of beneficial visitors – ladybugs, green lacewings, hoverflies, midges (and the larva of all), and many birds (especially the young). If there are no aphids these predator bugs lose a significant component of their diet. An enlightened gardener therefore, learns to leave well enough alone.

There is wisdom to be gained from Ms. Alexander’s refrain. When I find myself lamenting the loss or damage to a prized plant by some hungry critter, those words ‘all creatures great and small’ start playing in my head. Yes, all have a role to play.

I haven’t figured out yet what role that ‘Wascally Wabbit’ has to play (they do love to eat dandelions), nor the pesky squirrels (I guess they too are a food source, most notably for the magnificent birds of prey), but I can’t help feeling some compassion, even kinship, with these animals that make my yard and garden their home – in a way we’re all in this together. I have a particular soft spot for the young ones. A touching experience with a very young squirrel the other day underscored my feelings. I don’t know where he came from or where he disappeared to, but to me he appeared too young to be without his mama. He was quite enamoured of both me and my husband and stayed to ‘visit’ with us for a bit, then scampered off. He sure was a cute.

Some years ago my father and his wife sent me this lovely birthday card – don’t know if they chose it just for its garden theme or if they recognized the gem of wisdom it contained:

The garden is home to so many – kinda puts it all in perspective doesn’t it?

So fellow gardeners, take heart  –  ‘Lucky is the World……to have you in it.’

Happy Mother’s Day,

Sue

© Sue Gaviller and Not Another Gardening Blog 2012.

Unauthorized use and/or duplication of this material without express and written permission from this blog’s author and/or owner is strictly prohibited. Excerpts and links may be used, provided that full and clear credit is given to Sue Gaviller and Not Another Gardening Blog with appropriate and specific direction to the original content.

CURVES WONDERFUL CURVES: Good Lines Mean Good Designs – Part 2

At the end of March, I published a post on some of the early, though somewhat obscure, Harbingers of Spring – for me these offer hope after a long cold winter (my tolerance for winter must be decreasing as I get older, because this winter was neither long nor particularly cold).

The glimmer of colour I noticed radiating from tree branches last month is now a full-on flush of green as plumped-up buds become tiny unfurling leaves, especially after this week’s rain. The waiting game it seems is over. Hooray, gardening season is upon us! Perennials and annuals have been arriving at local greenhouses for a few weeks, trees and shrubs are here now too. Rakes, shovels, gloves and overalls are coming out of storage – it’s time to start ‘digging in the dirt’. Okay hold on there gardeners, slow down – remember you need to get those garden design lines right first. Guess I better finish Part 2 of GOOD LINES MEAN GOOD DESIGNS before your attention turns to the array of bright shiny things at your neighbourhood nursery.

Alrighty then … last post we looked at Landscape Design Concepts that contain straight lines – from that discussion you might conclude that a rectilinear design theme is my preferred concept form. Not so – in fact my back yard is curvilinear and my front yard, arc and tangent.  So you see I do like curves, but if I’d presented curving themes first, would you have read further?

CURVILINEAR FORM

Curves are the design line most favoured by gardeners, often to the exclusion of other design themes. Admittedly, there is something very captivating about voluptuous curves – the problem is curvilinear designs are the hardest to execute skillfully. The curves required to make this design theme work, are sweeping arcs as opposed to wiggly lines.

The curvilinear design theme is a design formed from continuous flowing lines using the circumferences of adjacent circles and/or ellipses. The fewer circles used and the more of each circle you can utilize, the more effective this theme will be.

Weak vs. Strong design lines. The top image illustrates weak design lines formed from many circles, utilizing a small portion of each circle. The bottom example illustrates strong design lines formed from fewer circles utilizing a greater portion of each circle.

Unfortunately the tendency is to use too many smaller arcs. As I’ve mentioned before, gardeners tend to subscribe to the adage that more is better – they equate simple with boring and mistakenly assume that adding a few more bows and bends will up the wow factor. It doesn’t. Instead it creates an awkward kind of visual movement as the eye wanders along a vague path.

The extra curves (top left) unnecessarily complicate this design line. The simplified curve shown in the second image (bottom right) would create a more effective curvilinear design.

Not all sites or space allotments are ideal for a curvilinear design theme. It’s really best suited for a site that is relatively large – large enough to accommodate some big bold arcs. Sometimes though, there may be a reasonable amount of space, but only in one direction, say a site that is either narrow and deep, or wide and shallow.  In this case, the solution might be to choose a different concept form altogether, or you may just have to be a little creative in your understanding of the curvilinear theme.

Side yards are typically long and narrow – gardeners often opt for a weak serpentine line like the one on the left, assuming there isn’t room for larger arcs. Instead, one could reinterpret the curvilinear theme to include a straight line, resulting in a bolder design line.

A back yard with very little depth can still be designed in a curvilinear fashion, but not with the use of weak wavy lines(left). Including one or two straight lines can allow for the use of longer deeper arcs even when space is tight(right).

But what if you have no appreciable distance in either direction – does this mean you are limited to straight lines?  Not necessarily. While a very small urban yard doesn’t lend itself to a curvilinear design theme, there are still ways you can incorporate curves into your garden beds. The Arc and Tangent Form I discussed in my last post can work nicely in a small yard, or you could try a circular design form, which is made up of circles and portions of circles. There are several circular design themes, but the simplest of them is overlapping circles.

CIRCULAR FORM – OVERLAPPING CIRCLES

An overlapping circular design is formed entirely from the arcs of overlapping circles. The key to making this design theme work is to use a variety of sizes, with one dominant circle. The circles should overlap enough that they can intersect at 90 degrees or more, thus avoiding acute angles.

An Overlapping Circular design theme can work equally well on a small site or a large site, because the circles can be moved in any direction. Note that on the larger property space is taken up, not by increasing the number of circles, but rather the size of the circles. This ensures that they will be in scale with the site.

A lovely example of an overlapping circle design. Photo Credit: Merton Designs, Dublin


MAKING YOUR DESIGN LINES WORK

Regardless of whether you choose a curving or straight line design there a few things to keep in mind.

  • Maintain continuity – stick with one design theme, as mixing themes will result in disunity.  This doesn’t mean that you can’t include an arc or a circle in an angular design, but the dominant theme must still be angular. It’s also acceptable to use one form in the front yard and a different one in the back, assuming that they are visually separated hence wouldn’t be experienced together.

This angular design contains a single arc for the purpose of creating emphasis.

  • Avoid acute angles – when design lines meet at less than 90 degrees, acute angles are formed. These are best avoided if at all possible. Aesthetically, these sharp angles appear awkward – in fact as a design instructor, they are first thing my eye goes to when critiquing student’s work. Functionally, there are several reasons to avoid them – in concrete, the use of acute angles creates weak areas prone to cracking. In beds and borders it creates tiny unusable spaces, too small for plants to grow in, and in lawns creates tight spots that are difficult to mow.
The use of acute angles in garden design is not recommended, for both functional and aesthetic reasons.

The use of acute angles in garden design is not recommended, for both functional and aesthetic reasons.

  • Use design lines to guide planting – the outline of your garden beds can influence ‘where you plant what’. For example, the space that is created when a design line arcs or juts out, is a great place for a feature plant or Focal Point. As well, you can accentuate your design lines by planting a single type of plant along the entire length of that line. Or you can alternate two or three different plants in a rhythmic pattern along the line, which will also serve to emphasize it.
The generous curves in this simple curvilinear design are accentuated by the alternating blue and green Junipers. The Malus 'Rosyglo' in the foreground is nicely 'framed' by the arching design line around it. Photo: Sue Gaviller

The generous curves in this simple curvilinear design are accentuated by the alternating blue and green Junipers. The Malus ‘Rosyglo’ in the foreground is nicely ‘framed’ by the arching design line around it. Photo: Sue Gaviller

Okay gardeners, I’m finished talking about arcs & angles, form & function and other designerspeak. Now you can go plant shopping – if you’re like me you’ll be the proverbial ‘kid in a candy store’. They say you should never go grocery shopping when you’re hungry….

Happy Gardening (at last),
Sue

© Sue Gaviller and Not Another Gardening Blog 2012.

Unauthorized use and/or duplication of this material without express and written permission from this blog’s author and/or owner is strictly prohibited. Excerpts and links may be used, provided that full and clear credit is given to Sue Gaviller and Not Another Gardening Blog with appropriate and specific direction to the original content.

GOOD LINES MEAN GOOD DESIGNS

Now that spring is here we can … well we can wait. The ground is almost fully thawed (I know this because my Rhodos tell me so) but it’s still too early to start digging in the soil – to do so could harm its delicate structure.

So what then is a restless gardener to do? Some will busy themselves with tasks from spring ‘to do lists’ posted by local gardening sites/blogs. Others pore over mail order catalogues and websites looking for inspiration. And we all try to visualize the dozens of new plants we’ll surely add to our gardens this year – as if the addition of new plant material will magically solve any dissatisfaction we had with last year’s garden. Sometimes it does, but more often not – good designs don’t begin there.

Functional Drawings

Most gardeners fail to understand that good design isn’t about manipulating plants, it’s about manipulating space. And good use of space begins with … the ‘f-word’. That’s right – function.  As gardeners, we often arrive at function last – perhaps if we’d considered it first we’d be much happier with our gardens. So we need to ask ourselves, “What is it we want to achieve here?” How do we want to utilize our outdoor space? For example, do we want a place to sit and relax? If so, do we want sun or shade?  And since the sunny and shady spots in our yards will be determined by the direction of the sun at any given time of day, what time of day are we most likely to be sitting outside? Do we need some lawn for children to play on, a place for Fido to call his own, a dining space, an entertainment space, a space to grow vegetables, a utility space etc.?

It can be helpful to map this out on paper – in fact a ‘functional drawing’ is the first step in the design process. It’s the ‘where everything goes’ phase and the site’s individual attributes will often determine where a particular functional space will be best located. For instance, a vegetable garden needs a considerable amount of sun, and young children will need a shadier spot. A dining space we’ll probably want conveniently close to the house and out of the wind, and the garbage, compost, workspace etc. we may want further away and out of sight. And be sure to allow enough room for a given space to fulfill its intended function – without creating areas that will be awkward to maintain or difficult to access. For example, a patio should be large enough that chairs can be pushed out from the table after a meal, a front walkway wide enough for 2 people to walk on, and a mixed shrub bed large enough to accommodate average-size shrubs (with a mature spread of 4-6 feet).

Let’s look at a real life example – I’ve adapted this from a recent client scenario. These clients wanted to redo their front yard, specifically the entrance – new walkway, sitting area, new garden beds. A functional diagram therefore, might look something like this:

The site itself often determines where a particular landscape element is most appropriately situated. In this example, the house, the garage and the existing wall create a semi-enclosed space perfectly suited to a sitting area.

The site itself often determines where a particular landscape element is most appropriately situated. In this example, the house, the garage and the existing wall create a semi-enclosed space perfectly suited to a sitting area.

Note that each space is still formless and depicted only by a simple oval shape, a bubble if you will. Indeed a functional drawing is often referred to as a ‘bubble diagram’.

Concept Drawings

Once you have sketched your map of functional spaces you can begin to give each space form in a Concept Drawing. A concept drawing outlines the shape of patios, walkways, garden beds etc.. This is where the real creativity in garden design begins, and yet gardeners are often stumped at this point – where do we begin? Gardeners limit themselves unnecessarily by ruling out all but curving design lines – curves are indeed a sensuous type of line, but they aren’t the only design line to choose from. In fact curvilinear designs aren’t always the best choice and more often than not, they are executed poorly.

Let’s look again at the real life example – since the space articulated by the house, garage and wall is rectangular, the best place to start is with a design concept that includes some straight lines. Those who lack design training might advise you that straight lines aren’t good garden lines, claiming that ‘there are no straight lines in nature’, but just take a look at a blade of grass, a leaf vein, rock face, tree branch, a pine or spruce needle, a thorn, etc. –  of course they may not be truly straight, but  perceptually they are straight and quite likely as straight or straighter than any line we might carve out in our gardens. Okay point made.

There are a number of design themes that include straight lines, but the 3 basic ones are Rectilinear, Angular/Diagonal and Arc & Tangent. Using the abovementioned Functional Diagram, I presented three possible options to my clients.

A Rectilinear design theme consists of shapes and lines that establish 90 degree relationships to each other and to the house or adjacent building. Here these lines are used to create a quadripartite courtyard design.

An Angular design theme consists of lines drawn at 45 or 60 degrees to the house, but 90 degrees or more to each other. To avoid the use of acute angles (less than 90 degrees), some lines will necessarily be perpendicular to the house.

The Arc & Tangent design theme is made up of arcs (¼ circle, ½ circle and/or ¾ circle) and straight lines that are tangent to those arcs.

The clients liked all three but were leaning towards the rectilinear design. However, they preferred the arc and tangent shape of the bed adjacent to the house – was it possible, they asked, to incorporate an arc into this bed and still choose the rectilinear design? The answer is of course yes – since an Arc & Tangent design is basically a Rectilinear design with arcs inserted into some of the corners, adding one or two arcs to this design still maintained a unified theme. So the resultant Concept looked something like this:

The Rectilinear theme and the Arc & Tangent theme relate well to each other so the client could, in this case, have the best of both. An additional rectangular bed was added to incorporate the existing gas lamp into the design.

Let’s look at the above three design themes in a little more detail.

RECTILINEAR FORM

Rectilinear form has received a bad rap – perhaps because its straight lines are associated with the straight narrow strips of soil against the house or fence that our mothers or grandmothers called their gardens. In reality this design form is made up of adjacent and/or overlapping squares and rectangles, which create much more interesting design lines.

The original owner of this house was an architect and had designed it in a ‘Frank Lloyd Wright-esque’ manner – my client wanted a design that would work with the style of the house, hence the rectilinear form. These photos were taken when this landscape was quite new – it has filled out considerably since then. Photos: Sue Gaviller

I drive by this landscape regularly and I’m always impressed with how great it looks, regardless of the season. This is partly owing to the strong design lines – the rectilinear design theme reflects the contemporary lines of the house. Photo: Sue Gaviller

The above two examples are small-scale urban applications of this design form, but it can be equally as applicable on a larger scale with a more ‘rural’ feel – check out this link for some lovely examples.

ANGULAR/DIAGONAL FORM

This design theme has a strong angular component, although all lines don’t need to be angled – sometimes a single purposeful angled line can achieve that angular component quite nicely. Ideally a diagonal design is just a rectilinear design, but rotated 45 or 60 degrees. There are a number of scenarios this form works well for, e.g. a property that is disproportionately longer than it is wide.  The long straight property lines draw our eye directly to the back of the property, but when angled design lines are used, the angled bearing encourages the eye to move along a less direct path, detracting from the site’s long narrow configuration. Another example where a diagonal or angular theme would be appropriate is a site with an angled property line.

A long narrow yard can feel a bit like a bowling alley – making use of an angular or diagonal concept can diminish this effect by drawing the eye away from the back of the yard.

The North property line angles at approximately 30/60 degrees to the house so an angular design theme using that same angle worked very well here.

For a couple of good photographic examples of angular designs, click here and here.

ARC AND TANGENT FORM

This design theme is made up of arcs and straight lines – an arc and tangent concept can be thought of as a rectilinear theme with arcs inserted into some of the corners. The arcs can be ¼ circles, ½ circles or ¾ circles and should be large enough that it actually looks like lines and arcs and not just right angles with slightly bevelled corners.

The easiest way to arrive at an arc & tangent concept is to begin with a rectilinear theme and insert arcs into some of the corners.

I find that photographing this design form is tricky because of the role perspective plays – the straight lines don’t always look truly tangent to the arcs. Below are a couple of photos from several years ago.

The Arc & Tangent design theme lends itself nicely to the architectural lines of the house. The landscape has matured some since this photo was taken. Photo: Sue Gaviller

A simple Arc and Tangent form effectively outlines this mixed shrub and perennial border. Photo: Sue Gaviller

So there you have it – a case for straight lines in the garden. Next post I’ll cover a couple of the curving design themes. In the meantime, try playing with new lines for your garden – on paper of course. And don’t be afraid to think outside the box – or maybe I should say ‘inside the box’.

Til then,
Sue

© Sue Gaviller and Not Another Gardening Blog 2012.

Unauthorized use and/or duplication of this material without express and written permission from this blog’s author and/or owner is strictly prohibited. Excerpts and links may be used, provided that full and clear credit is given to Sue Gaviller and Not Another Gardening Blog with appropriate and specific direction to the original content.