Colouring Your Garden – Part 9: Colour Schemes

Over my last 8 posts I have looked at colour theory in considerable depth, focussing of course on its application in  garden design. One of the most powerful ways we can utilize this knowledge is by experimenting with colour schemes in our gardens.

Many gardeners balk at the idea of purposefully employing a garden colour scheme, assuming it’s just one more rule to follow, or at the very least, too restrictive.

Utilizing a colour scheme doesn’t have to be restrictive though, if we think rather in terms of a hue scheme. Looking to the Munsell Book of Colour, we find that for each hue, there are many permutations of value and saturation all arranged on an individual page. So if we want to work with a scheme which includes red, we have a whole hue page to choose from  just for red! The other hues in our scheme afford us the same broad selection of colours. A little less restrictive than you thought, right?

Colour Schemes

A colour scheme is a planned or logical combination of hues on a colour wheel. As we discussed in earlier posts, there is more than one colour wheel, but you’ll probably find the artist’s colour wheel to be the most user-friendly. You can then refer to Munsell hue pages (or reasonable facsimile) for guidance with the various colours that fall within that hue. I do sometimes utilize Munsell’s hue circle to work out colour schemes, but they aren’t always as straightforward. For ease of use then, I am mixing models here.

So how does one go about choosing a colour scheme for the garden? If your house or other backdrop is a particularly strong chromatic colour, then it’s most effective if you include that colour in your scheme. If on the other hand, your house is more neutral, then start with a colour you really like and build from there.

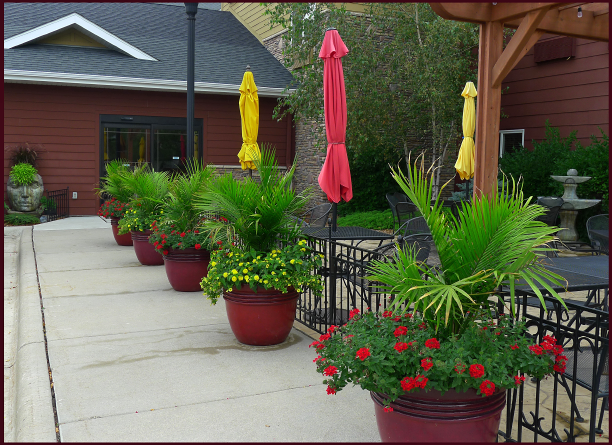
The colours used in this restaurant patio planting echo the muted red and yellow hues of the siding on the building. Photo: Sue Gaviller

Keep in mind that most plants – both in your garden and in the surrounding landscape – have green foliage, hence green will always be present. Since this hue is so much a part of the outside world, the eye tends to ignore it, and will instead focus on other colours. Green is therefore experienced mostly as a backdrop for your garden composition. But it can certainly be one of the hues in your colour scheme too.

You can vary the colour schemes from one part of the garden to another (particularly if you have a large canvas), and the scheme can also change or evolve as the season progresses. For example a garden that has a yellow-green and red-violet combination in the spring might add other colours later in the season, but those hues must always be part of the scheme.

Realistically speaking, some scenarios don’t lend themselves to formal colour schemes (if only for the reason that the proprietor of a well established garden may not want to part with anything – just to incorporate a colour scheme). One can still play with colour schemes though; containers are a great way to experiment without committing to a particular composition.

So let’s have a look at what we can construct using the artist’s colour wheel and some Munsell hue pages.

Monochromatic colour schemes use various values and degrees of saturation of a single hue. Working with a single hue creates naturally harmonious colour compositions.

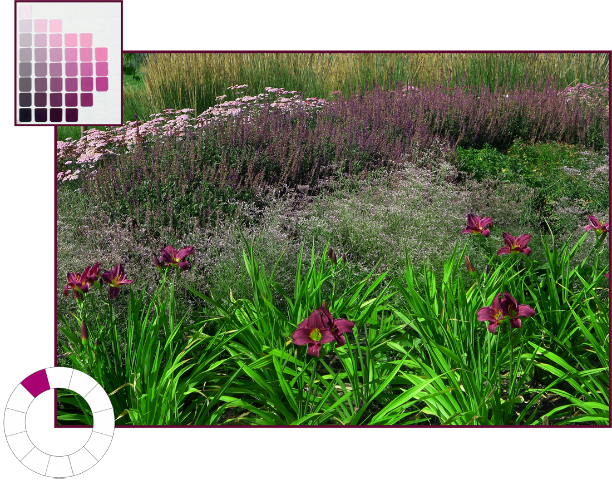
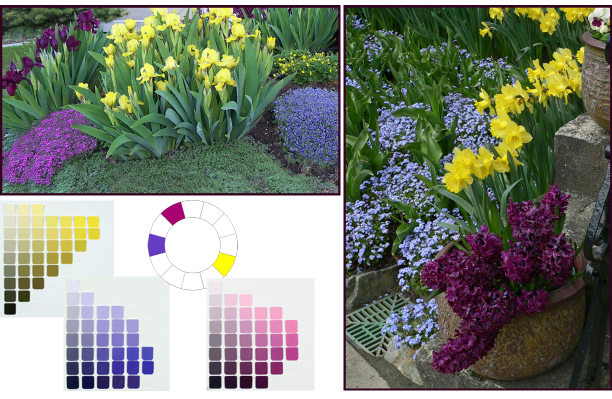
Monochromatic colour scheme using the hue of red-violet (5RP). Photo and graphics: Sue Gaviller

Complementary colour schemes contain two hues that are opposite each other on the colour wheel.

This is a high contrast colour combo, which means it can be loud and demand attention. So you’ll want to tame it by including numerous value/saturation variations of the pure hues – and of course lots of green.

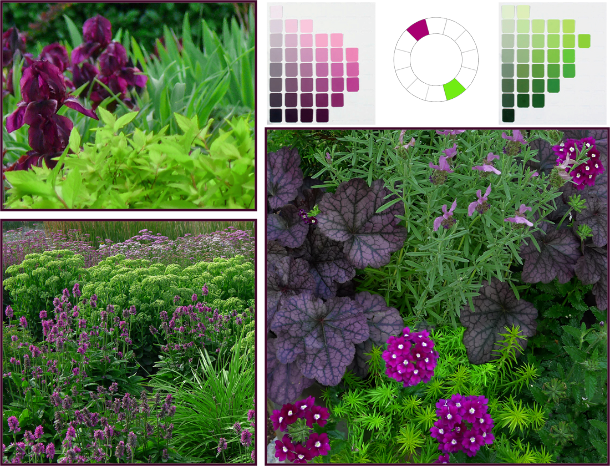
Complementary Colour Scheme: Red-violet (5RP) and yellow-green (5GY). Photos: Top left – Pat Gaviller. Bottom and right – Sue Gaviller

Analogous colour schemes use two or three hues that are next to each other on the colour wheel.

Although this is a low contrast combination, analogous hues still benefit from utilizing variations in saturation and value of the chosen hues, thus introducing more variety. Remember if you choose warm hues, there will need to be significant green (foliage) in your composition to provide the necessary cool/warm balance.

analagous-r-o-o-y-o-resize

Analogous Colour Scheme: red-orange (10R), orange (5YR) and yellow-orange (2.5Y). Photos and graphics: Sue Gaviller

Counterpoint schemes consist of a hue and one of the hues on either side of its complement.

This too is a dynamic colour combo, but somewhat less so than complementary compositions – many people prefer this colour duo as it generates less visual conflict. Again the use of variations in value and saturation of the two hues will create both unity and variety.

Photos: Sue Gaviller

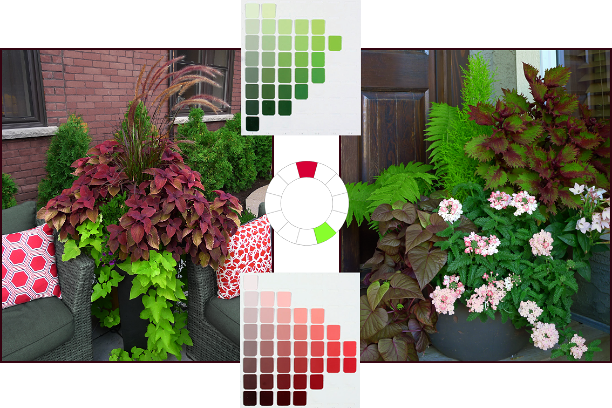
Counterpoint Colour Scheme: red (5R) and yellow-green (5GY). Photos and graphics: Sue Gaviller

Split-complementary schemes are three-hue combos that use one hue and the two hues on either side of its complement.

The split-complementary colour combo has all the dynamism of complementary and counterpoint, with the balancing addition of two hues that are closer together. A garden may transition from the aforementioned counterpoint theme to split-complementary as the growing season progresses and more plants (thus more colours) take the stage.

Split Complementary colour scheme - yellow, blue-violet and red-violet. Photos: Top left: Cathy Gaviller. Right: Jane Reksten

Split Complementary colour scheme: yellow (5Y), blue-violet (7.5PB) and red-violet (5RP). Photos: Top left – Cathy Gaviller. Right – Jane Reksten. Graphics: Sue Gaviller

Analogous-complementary schemes use two adjacent hues and the complement of one of those hues.

Similar in effect to split-complementary, analogous-complementary schemes are especially soothing if the analogous constituents are cool hues.

Analogous-Complementary Colour Scheme: violet (5P), red-violet (5RP) and yellow-green (5YG). Photos: Sue Gaviller

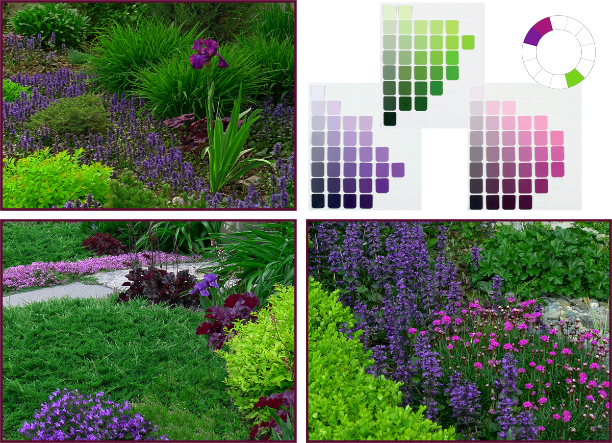
Analogous-complementary Colour Scheme: violet (5P), red-violet (5RP) and yellow-green (5GY). Photos: Top left – Pat Gaviller. Bottom left/right – Sue Gaviller. Graphics: Sue Gaviller

Double-complementary schemes use two adjacent colors and the complements of both of those hues.

Graphics: Sue Gaviller

This four-hue scheme brings both drama (from opposites) and subtlety (from analogues) to a garden composition, and can be a natural seasonal transition from analogous-complementary as more plants come into bloom.

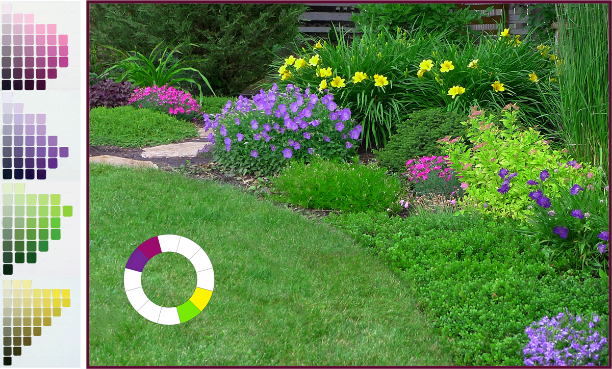
Double-complementary Colour Scheme: violet (5P), red-violet (5RP), yellow (5Y) and yellow-green (5GY). Photo and graphics: Sue Gaviller

Diads are colour schemes that consist of two hues located two spaces apart on the colour wheel.

Though this colour duo provides more contrast than an analogous scheme, it is still a low-contrast theme and less dramatic than higher contrast combinations. More contrast can be introduced if one of the hues is warm and one is cool, for example red and purple.

Diadic Colour Scheme: red (5R) and violet (5P). Photos: top – Pat Gaviller. Bottom – Sue Gaviller. Graphics: Sue Gaviller

Triads use three hues that are equally spaced around the colour wheel.

Triadic schemes offer interesting colour combinations and are inherently balanced because the hues are all equidistant from each other.

Triadic Colour Scheme: Violet-blue (7.5PB), orange-red (10R), and yellow-green (5GY). Photos: Sue Gaviller

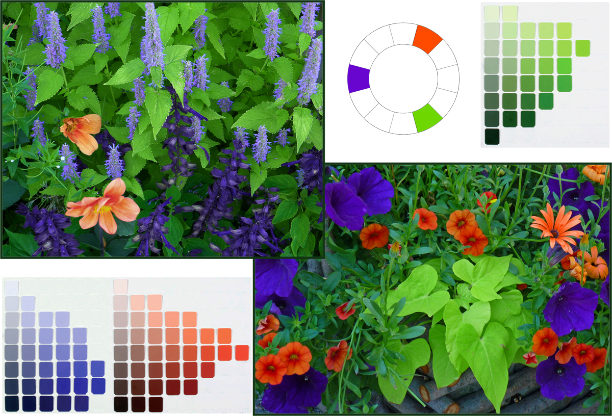
Triadic Colour Scheme: blue-violet (7.5PB), orange-red (10R), and yellow-green (5GY). Photos and graphics: Sue Gaviller

Tetrads are colour schemes using four hues that are consistently spaced on the colour wheel.

  • Square tetrad – 4 hues touched by the four corners of a square placed in the centre of the colour wheel.
  • Rectangular tetrad – 4 hues touched by the four corners of a rectangle placed in the centre of the colour wheel

Four-hue schemes provide considerable colour choice thus can be quite vibrant, especially when hues are at full saturation. They can be toned down somewhat with the addition of less saturated versions of the pure hues.

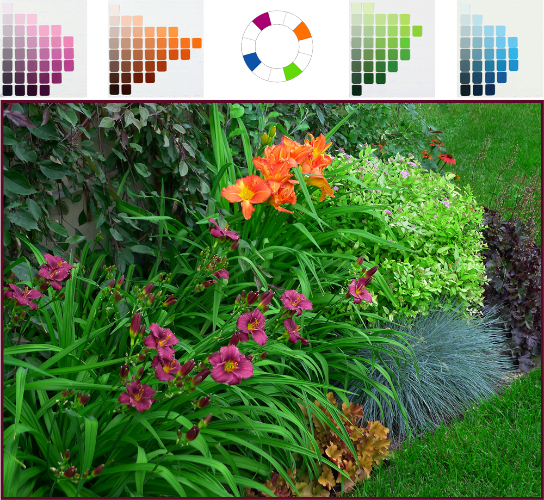
Tetradic Colour Scheme: red-violet (5RP), orange (5R), yellow-green (5GY) and blue (5B). Photos and graphics: Sue Gaviller

You can see that with all the variations in value and saturation for each hue, many different but related colours are available to you – even when using only a couple of hues. Unfortunately, most of us don’t have access to the Munsell Book of Color, but there are numerous apps and online tools that will provide more than enough visual info for application in the garden.

I highly recommend the Virtual Munsell Color Wheel. It’s very easy to use – just bear in mind that it includes all the intermediate hues that lie between the basic hues (totaling 40 hues), which you may find overwhelming. The digital ‘hue pages’ aren’t identical to those in the Munsell Book of Colour either (copyright and such). You’ll also note that, compared to the traditional RYB colour wheel, Munsell’s blue (5B) appears more green and his purple-blue (5PB) more blue – this is because he divided the circular colour spectrum differently. I wouldn’t get too carried away with detail or accuracy though. Just choose your colour scheme using the artist’s colour wheel and find the hues that most closely approximate them on the Virtual Wheel.

Finding foliage or flowers in exactly the right colour may be next to impossible anyway. But don’t get discouraged. Remember green foliage abounds in the garden, and with all that ‘green between’, you’ll find that almost-the-right-colour will be close enough.

‘Til next time,
Sue


Say it Again Sue

Happy New Year fellow gardeners! It’s a week or two into 2014 and I’d like to bid a fond farewell to 2013. Let me rephrase that. I’m so glad to see the arse-end of the year 2013!

It wasn’t my finest year.

Like many of you, I made some New Year’s Resolutions. Most are pretty straightforward; return to healthier eating, lose some weight, get more exercise, spend less time in front of my computer screen, blah, blah, blah. Challenging as it may be to abide by such resolutions, if I can commit to them for even a few weeks, perhaps these lifestyle changes will become re-established in my daily repertoire of healthy behaviours – they say it takes only 21 days to form a habit.

However, not all of my avowed changes are quite so straightforward; be more organized, procrastinate less; qualities that just aren’t part of my make-up – supposedly one can learn though. I’ve also decided that from now on I will try to think before speaking. Yikes! How does one possibly remember to catch oneself each time the mouth opens to speak; to always first consider: is what I’m about to say necessary, or useful? Will I come on too strong, or too loud, is this a “think” or a “say”, will I be oversharing or heaven forbid, repeating myself?

I was advised once, by a well-meaning person of course, that I have an annoying habit of repeating myself. Not entirely untrue I guess. In my defense though, experience has taught me that some people need to hear things several times before they get it. And as a design instructor and lecturer I also know that some things merit repeating – whether within the same address or at a later date as a review. It’s what good teachers do. For example, since this blog’s inception I have thrown oodles of design advice at you – do you remember all of it? Not likely. Do you remember exactly where to find whatever information you might want to revisit? Probably not. Repeating myself would be helpful here no? Perhaps a review to help you navigate both the design process and this site – all my design advice in a tidy little bundle with links to the applicable posts where you’ll find the information you seek.

You’re welcome! It’s what good teachers do.

Design Process and Principles – A Review

The Process

The first thing I want to reiterate, and this can’t be overstated, is that design is primarily about organizing and arranging space, not plants. The same way a house must first be properly designed and built before it can be furnished, so the outline of a garden or landscape must first be planned before plants are considered. The functionality of any given space should be the designer’s chief concern, followed by its form – hence the designer’s mantra “form follows function”. The design process then, looks like this (click on the red text to go to corresponding post):

Phase 1 – FUNCTIONAL DRAWINGS: one must first determine what one want or needs; for example, garden beds, a deck or patio, walkway, lawn, fireplace etc., and then decide where each will be situated. Various possible locations for each element can be explored before deciding on the best placement for your particular needs.

Phase 2 – CONCEPT DRAWINGS: once you know what you want and where you want it, you can give form to your garden beds, patio, walkway and other garden elements. Remember your design concept can consist of:

As you play with various design lines, there are some Key Things to Remember:

  • Maintain Continuity
  • Avoid acute angles
  • Use design lines to guide planting

Phase 3 – Planting Plan: when your landscape or garden outline has been conceptualized, plants can then be considered. However, before one can effectively arrange plant material, some governing principles must first be understood – we’ll return to the Planting Plan later.

The Guiding Principles

Although designing a garden or landscape requires both creativity and knowledge, anybody can learn how to improve their own gardens with the help of a few guidelines or Design Principles. These principles, as applied to landscape design are:

  1. UNITY – a sense of oneness and harmony in the garden, achieved through:
    • Repetition – repeating elements throughout a composition.
    • Dominance – one element or group of elements is given emphasis
    • Unity of Three – arranging elements in groups of three (or odd numbers)
    • Interconnection – physically connecting all landscape spaces
  2. BALANCE – perceived equilibrium in a garden or landscape composition. Balance can be Symmetrical or Asymmetrical.
  3. MOVEMENT – visual motion throughout a composition
  4. SCALE – size of landscape elements in relation to their surroundings
  5. PROPORTION – size of landscape elements in relation to each other

The Planting Plan Revisited

With a rudimentary understanding of design principles you’ll now be in a better position to choose and arrange plant material, but there are still procedural steps to follow:

  1. FUNCTION – determine if there are functional roles like shade or privacy that you need plants to play.
  2. AESTHETICS – plants provide visual appeal from their physical traits:
  • Colour
    • Gardeners looove colour don’t we? I have touched only lightly on the effective use of colour in the garden. Colour theory is a big topic and I’m still trying to decide how I want to approach it – how much information will be enough, without being too much (see I’m already adhering to one of my resolutions; I’m thinking before speaking, er writing).

Well my friends that wraps up my review – a little New Year’s gift for you. Keep this post handy for future reference – design advice is just a click away.

You’re welcome! It’s what good teachers do.

Yours,
Sue

CURVES WONDERFUL CURVES: Good Lines Mean Good Designs – Part 2

At the end of March, I published a post on some of the early, though somewhat obscure, Harbingers of Spring – for me these offer hope after a long cold winter (my tolerance for winter must be decreasing as I get older, because this winter was neither long nor particularly cold).

The glimmer of colour I noticed radiating from tree branches last month is now a full-on flush of green as plumped-up buds become tiny unfurling leaves, especially after this week’s rain. The waiting game it seems is over. Hooray, gardening season is upon us! Perennials and annuals have been arriving at local greenhouses for a few weeks, trees and shrubs are here now too. Rakes, shovels, gloves and overalls are coming out of storage – it’s time to start ‘digging in the dirt’. Okay hold on there gardeners, slow down – remember you need to get those garden design lines right first. Guess I better finish Part 2 of GOOD LINES MEAN GOOD DESIGNS before your attention turns to the array of bright shiny things at your neighbourhood nursery.

Alrighty then … last post we looked at Landscape Design Concepts that contain straight lines – from that discussion you might conclude that a rectilinear design theme is my preferred concept form. Not so – in fact my back yard is curvilinear and my front yard, arc and tangent.  So you see I do like curves, but if I’d presented curving themes first, would you have read further?

CURVILINEAR FORM

Curves are the design line most favoured by gardeners, often to the exclusion of other design themes. Admittedly, there is something very captivating about voluptuous curves – the problem is curvilinear designs are the hardest to execute skillfully. The curves required to make this design theme work, are sweeping arcs as opposed to wiggly lines.

The curvilinear design theme is a design formed from continuous flowing lines using the circumferences of adjacent circles and/or ellipses. The fewer circles used and the more of each circle you can utilize, the more effective this theme will be.

Weak vs. Strong design lines. The top image illustrates weak design lines formed from many circles, utilizing a small portion of each circle. The bottom example illustrates strong design lines formed from fewer circles utilizing a greater portion of each circle.

Unfortunately the tendency is to use too many smaller arcs. As I’ve mentioned before, gardeners tend to subscribe to the adage that more is better – they equate simple with boring and mistakenly assume that adding a few more bows and bends will up the wow factor. It doesn’t. Instead it creates an awkward kind of visual movement as the eye wanders along a vague path.

The extra curves (top left) unnecessarily complicate this design line. The simplified curve shown in the second image (bottom right) would create a more effective curvilinear design.

Not all sites or space allotments are ideal for a curvilinear design theme. It’s really best suited for a site that is relatively large – large enough to accommodate some big bold arcs. Sometimes though, there may be a reasonable amount of space, but only in one direction, say a site that is either narrow and deep, or wide and shallow.  In this case, the solution might be to choose a different concept form altogether, or you may just have to be a little creative in your understanding of the curvilinear theme.

Side yards are typically long and narrow – gardeners often opt for a weak serpentine line like the one on the left, assuming there isn’t room for larger arcs. Instead, one could reinterpret the curvilinear theme to include a straight line, resulting in a bolder design line.

A back yard with very little depth can still be designed in a curvilinear fashion, but not with the use of weak wavy lines(left). Including one or two straight lines can allow for the use of longer deeper arcs even when space is tight(right).

But what if you have no appreciable distance in either direction – does this mean you are limited to straight lines?  Not necessarily. While a very small urban yard doesn’t lend itself to a curvilinear design theme, there are still ways you can incorporate curves into your garden beds. The Arc and Tangent Form I discussed in my last post can work nicely in a small yard, or you could try a circular design form, which is made up of circles and portions of circles. There are several circular design themes, but the simplest of them is overlapping circles.

CIRCULAR FORM – OVERLAPPING CIRCLES

An overlapping circular design is formed entirely from the arcs of overlapping circles. The key to making this design theme work is to use a variety of sizes, with one dominant circle. The circles should overlap enough that they can intersect at 90 degrees or more, thus avoiding acute angles.

An Overlapping Circular design theme can work equally well on a small site or a large site, because the circles can be moved in any direction. Note that on the larger property space is taken up, not by increasing the number of circles, but rather the size of the circles. This ensures that they will be in scale with the site.

A lovely example of an overlapping circle design. Photo Credit: Merton Designs, Dublin


MAKING YOUR DESIGN LINES WORK

Regardless of whether you choose a curving or straight line design there a few things to keep in mind.

  • Maintain continuity – stick with one design theme, as mixing themes will result in disunity.  This doesn’t mean that you can’t include an arc or a circle in an angular design, but the dominant theme must still be angular. It’s also acceptable to use one form in the front yard and a different one in the back, assuming that they are visually separated hence wouldn’t be experienced together.

This angular design contains a single arc for the purpose of creating emphasis.

  • Avoid acute angles – when design lines meet at less than 90 degrees, acute angles are formed. These are best avoided if at all possible. Aesthetically, these sharp angles appear awkward – in fact as a design instructor, they are first thing my eye goes to when critiquing student’s work. Functionally, there are several reasons to avoid them – in concrete, the use of acute angles creates weak areas prone to cracking. In beds and borders it creates tiny unusable spaces, too small for plants to grow in, and in lawns creates tight spots that are difficult to mow.
The use of acute angles in garden design is not recommended, for both functional and aesthetic reasons.

The use of acute angles in garden design is not recommended, for both functional and aesthetic reasons.

  • Use design lines to guide planting – the outline of your garden beds can influence ‘where you plant what’. For example, the space that is created when a design line arcs or juts out, is a great place for a feature plant or Focal Point. As well, you can accentuate your design lines by planting a single type of plant along the entire length of that line. Or you can alternate two or three different plants in a rhythmic pattern along the line, which will also serve to emphasize it.
The generous curves in this simple curvilinear design are accentuated by the alternating blue and green Junipers. The Malus 'Rosyglo' in the foreground is nicely 'framed' by the arching design line around it. Photo: Sue Gaviller

The generous curves in this simple curvilinear design are accentuated by the alternating blue and green Junipers. The Malus ‘Rosyglo’ in the foreground is nicely ‘framed’ by the arching design line around it. Photo: Sue Gaviller

Okay gardeners, I’m finished talking about arcs & angles, form & function and other designerspeak. Now you can go plant shopping – if you’re like me you’ll be the proverbial ‘kid in a candy store’. They say you should never go grocery shopping when you’re hungry….

Happy Gardening (at last),
Sue

© Sue Gaviller and Not Another Gardening Blog 2012.

Unauthorized use and/or duplication of this material without express and written permission from this blog’s author and/or owner is strictly prohibited. Excerpts and links may be used, provided that full and clear credit is given to Sue Gaviller and Not Another Gardening Blog with appropriate and specific direction to the original content.

GOOD LINES MEAN GOOD DESIGNS

Now that spring is here we can … well we can wait. The ground is almost fully thawed (I know this because my Rhodos tell me so) but it’s still too early to start digging in the soil – to do so could harm its delicate structure.

So what then is a restless gardener to do? Some will busy themselves with tasks from spring ‘to do lists’ posted by local gardening sites/blogs. Others pore over mail order catalogues and websites looking for inspiration. And we all try to visualize the dozens of new plants we’ll surely add to our gardens this year – as if the addition of new plant material will magically solve any dissatisfaction we had with last year’s garden. Sometimes it does, but more often not – good designs don’t begin there.

Functional Drawings

Most gardeners fail to understand that good design isn’t about manipulating plants, it’s about manipulating space. And good use of space begins with … the ‘f-word’. That’s right – function.  As gardeners, we often arrive at function last – perhaps if we’d considered it first we’d be much happier with our gardens. So we need to ask ourselves, “What is it we want to achieve here?” How do we want to utilize our outdoor space? For example, do we want a place to sit and relax? If so, do we want sun or shade?  And since the sunny and shady spots in our yards will be determined by the direction of the sun at any given time of day, what time of day are we most likely to be sitting outside? Do we need some lawn for children to play on, a place for Fido to call his own, a dining space, an entertainment space, a space to grow vegetables, a utility space etc.?

It can be helpful to map this out on paper – in fact a ‘functional drawing’ is the first step in the design process. It’s the ‘where everything goes’ phase and the site’s individual attributes will often determine where a particular functional space will be best located. For instance, a vegetable garden needs a considerable amount of sun, and young children will need a shadier spot. A dining space we’ll probably want conveniently close to the house and out of the wind, and the garbage, compost, workspace etc. we may want further away and out of sight. And be sure to allow enough room for a given space to fulfill its intended function – without creating areas that will be awkward to maintain or difficult to access. For example, a patio should be large enough that chairs can be pushed out from the table after a meal, a front walkway wide enough for 2 people to walk on, and a mixed shrub bed large enough to accommodate average-size shrubs (with a mature spread of 4-6 feet).

Let’s look at a real life example – I’ve adapted this from a recent client scenario. These clients wanted to redo their front yard, specifically the entrance – new walkway, sitting area, new garden beds. A functional diagram therefore, might look something like this:

The site itself often determines where a particular landscape element is most appropriately situated. In this example, the house, the garage and the existing wall create a semi-enclosed space perfectly suited to a sitting area.

The site itself often determines where a particular landscape element is most appropriately situated. In this example, the house, the garage and the existing wall create a semi-enclosed space perfectly suited to a sitting area.

Note that each space is still formless and depicted only by a simple oval shape, a bubble if you will. Indeed a functional drawing is often referred to as a ‘bubble diagram’.

Concept Drawings

Once you have sketched your map of functional spaces you can begin to give each space form in a Concept Drawing. A concept drawing outlines the shape of patios, walkways, garden beds etc.. This is where the real creativity in garden design begins, and yet gardeners are often stumped at this point – where do we begin? Gardeners limit themselves unnecessarily by ruling out all but curving design lines – curves are indeed a sensuous type of line, but they aren’t the only design line to choose from. In fact curvilinear designs aren’t always the best choice and more often than not, they are executed poorly.

Let’s look again at the real life example – since the space articulated by the house, garage and wall is rectangular, the best place to start is with a design concept that includes some straight lines. Those who lack design training might advise you that straight lines aren’t good garden lines, claiming that ‘there are no straight lines in nature’, but just take a look at a blade of grass, a leaf vein, rock face, tree branch, a pine or spruce needle, a thorn, etc. –  of course they may not be truly straight, but  perceptually they are straight and quite likely as straight or straighter than any line we might carve out in our gardens. Okay point made.

There are a number of design themes that include straight lines, but the 3 basic ones are Rectilinear, Angular/Diagonal and Arc & Tangent. Using the abovementioned Functional Diagram, I presented three possible options to my clients.

A Rectilinear design theme consists of shapes and lines that establish 90 degree relationships to each other and to the house or adjacent building. Here these lines are used to create a quadripartite courtyard design.

An Angular design theme consists of lines drawn at 45 or 60 degrees to the house, but 90 degrees or more to each other. To avoid the use of acute angles (less than 90 degrees), some lines will necessarily be perpendicular to the house.

The Arc & Tangent design theme is made up of arcs (¼ circle, ½ circle and/or ¾ circle) and straight lines that are tangent to those arcs.

The clients liked all three but were leaning towards the rectilinear design. However, they preferred the arc and tangent shape of the bed adjacent to the house – was it possible, they asked, to incorporate an arc into this bed and still choose the rectilinear design? The answer is of course yes – since an Arc & Tangent design is basically a Rectilinear design with arcs inserted into some of the corners, adding one or two arcs to this design still maintained a unified theme. So the resultant Concept looked something like this:

The Rectilinear theme and the Arc & Tangent theme relate well to each other so the client could, in this case, have the best of both. An additional rectangular bed was added to incorporate the existing gas lamp into the design.

Let’s look at the above three design themes in a little more detail.

RECTILINEAR FORM

Rectilinear form has received a bad rap – perhaps because its straight lines are associated with the straight narrow strips of soil against the house or fence that our mothers or grandmothers called their gardens. In reality this design form is made up of adjacent and/or overlapping squares and rectangles, which create much more interesting design lines.

The original owner of this house was an architect and had designed it in a ‘Frank Lloyd Wright-esque’ manner – my client wanted a design that would work with the style of the house, hence the rectilinear form. These photos were taken when this landscape was quite new – it has filled out considerably since then. Photos: Sue Gaviller

I drive by this landscape regularly and I’m always impressed with how great it looks, regardless of the season. This is partly owing to the strong design lines – the rectilinear design theme reflects the contemporary lines of the house. Photo: Sue Gaviller

The above two examples are small-scale urban applications of this design form, but it can be equally as applicable on a larger scale with a more ‘rural’ feel – check out this link for some lovely examples.

ANGULAR/DIAGONAL FORM

This design theme has a strong angular component, although all lines don’t need to be angled – sometimes a single purposeful angled line can achieve that angular component quite nicely. Ideally a diagonal design is just a rectilinear design, but rotated 45 or 60 degrees. There are a number of scenarios this form works well for, e.g. a property that is disproportionately longer than it is wide.  The long straight property lines draw our eye directly to the back of the property, but when angled design lines are used, the angled bearing encourages the eye to move along a less direct path, detracting from the site’s long narrow configuration. Another example where a diagonal or angular theme would be appropriate is a site with an angled property line.

A long narrow yard can feel a bit like a bowling alley – making use of an angular or diagonal concept can diminish this effect by drawing the eye away from the back of the yard.

The North property line angles at approximately 30/60 degrees to the house so an angular design theme using that same angle worked very well here.

For a couple of good photographic examples of angular designs, click here and here.

ARC AND TANGENT FORM

This design theme is made up of arcs and straight lines – an arc and tangent concept can be thought of as a rectilinear theme with arcs inserted into some of the corners. The arcs can be ¼ circles, ½ circles or ¾ circles and should be large enough that it actually looks like lines and arcs and not just right angles with slightly bevelled corners.

The easiest way to arrive at an arc & tangent concept is to begin with a rectilinear theme and insert arcs into some of the corners.

I find that photographing this design form is tricky because of the role perspective plays – the straight lines don’t always look truly tangent to the arcs. Below are a couple of photos from several years ago.

The Arc & Tangent design theme lends itself nicely to the architectural lines of the house. The landscape has matured some since this photo was taken. Photo: Sue Gaviller

A simple Arc and Tangent form effectively outlines this mixed shrub and perennial border. Photo: Sue Gaviller

So there you have it – a case for straight lines in the garden. Next post I’ll cover a couple of the curving design themes. In the meantime, try playing with new lines for your garden – on paper of course. And don’t be afraid to think outside the box – or maybe I should say ‘inside the box’.

Til then,
Sue

© Sue Gaviller and Not Another Gardening Blog 2012.

Unauthorized use and/or duplication of this material without express and written permission from this blog’s author and/or owner is strictly prohibited. Excerpts and links may be used, provided that full and clear credit is given to Sue Gaviller and Not Another Gardening Blog with appropriate and specific direction to the original content.